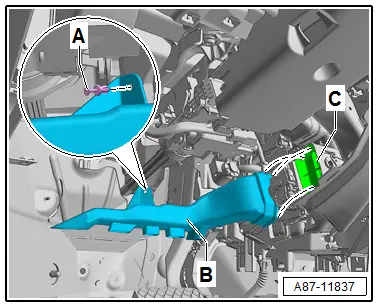
Audi Q7: Driver Side Footwell Vent, Removing and Installing
Removing
- Move the driver seat as far back as possible.
- Turn off the ignition.
- Remove the driver side instrument panel cover. Refer to → Body Interior; Rep. Gr.68; Storage Compartments and Covers; Driver Side Instrument Panel Cover, Removing and Installing.
- Remove the expanding rivet -A-.
- Remove the left footwell vent -B- from the heater and A/C unit -C-.
Installing
Install in reverse order of removal. Note the following:
 Note
Note
Check the footwell vent and heater and A/C unit for damage. Damaged or improperly joined connections can result in noises during operation.
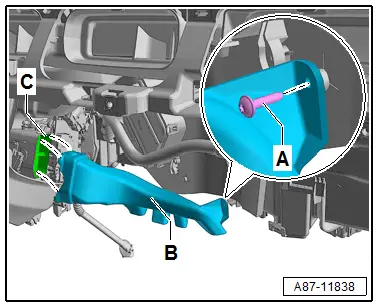
Front Passenger Side Footwell Vent, Removing and Installing
Removing
- Move the right front seat (front passenger seat) as far back as possible.
- Turn off the ignition.
- Remove the glove compartment. Refer to → Body Interior; Rep. Gr.68; Storage Compartments and Covers; Glove Compartment, Removing and Installing.
- Remove the screw -A- (tightening specification: 1 Nm).
- Remove the left footwell vent -B- from the heater and A/C unit -C-.
Installing
Install in reverse order of removal. Note the following:
 Note
Note
Check the footwell vent and heater and A/C unit for damage. Damaged or improperly joined connections can result in noises during operation.
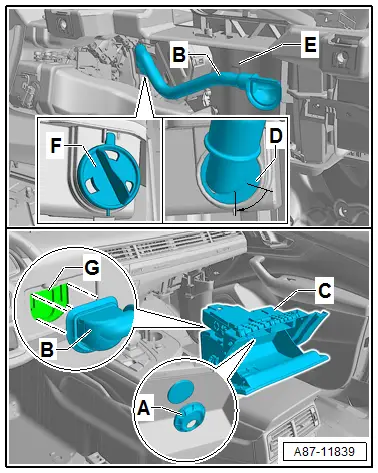
Air Guide for Glove Compartment Cooling, Removing and Installing
 Note
Note
- On vehicles without the optional equipment of "glove compartment cooling", the opening in the heater and A/C unit -E- is sealed with a cap -F-. In the glove compartment instead of the vent -A- a closure cap is installed.
- For the glove compartment cooling cooled air from the heater and A/C unit -E- is directed over the connection for the glove compartment cooling -D- and the hose -B-.

Removing
- Remove the right footwell vent (front passenger side). Refer to → Chapter "Front Passenger Side Footwell Vent, Removing and Installing".
- Loosen and remove the air duct for the glove compartment cooling -B- by turning the connection location -D- (-arrow-) from the heater and A/C unit.
Installing
Install in reverse order of removal. Note the following:
 Note
Note
- Check the air duct for the glove compartment cooling -B- for the correct latching on the glove compartment -G-.
- After installing the glove compartment make sure the air duct is latched correctly in the glove compartment cooling -B-.
- If the air duct hose is not installed correctly in the opening in the heater and A/C unit -E- or the glove compartment -G-, it can lead to noises at the connection locations or cause air in the front passenger footwell because of the radiator.

