Audi Q7: Component Location Overview - Controls in Center Console
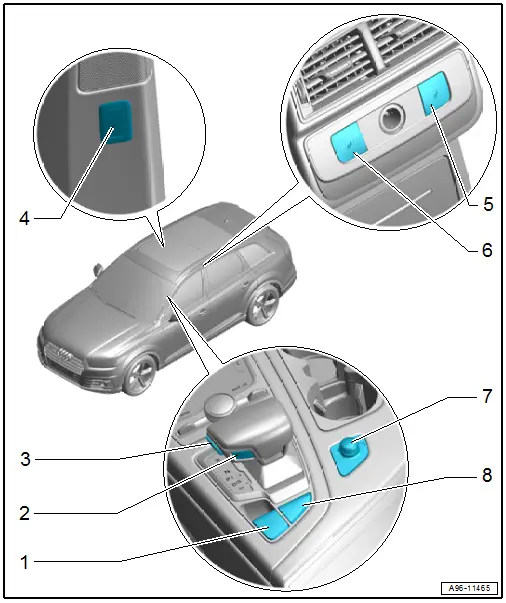
1 - Electromechanical Parking Brake Button -E538-
- Removing and installing. Refer to → Chapter "Electromechanical Parking Brake Button -E538-/-AUTO HOLD- Button -E540-, Removing and Installing".
2 - Parking Lock Button -E816-
- Integrated in the selector lever handle
- Cannot be replaced separately
- If faulty replace the selector lever handle. Refer to → Automatic Transmission; Rep. Gr.37; Selector Mechanism; Selector Lever Handle, Removing and Installing.
3 - Selector Lever Release Button -E681-
- Integrated in the selector lever handle
- Cannot be replaced separately
- If faulty replace the selector lever handle. Refer to → Automatic Transmission; Rep. Gr.37; Selector Mechanism; Selector Lever Handle, Removing and Installing.
4 - Front Passenger Side Rear Ionizer Button -E833-
- Country
- Removing and installing. Refer to → Chapter "Air Ionization System Button -E677-, Removing and Installing".
5 - Right Seat Heating Button -E654-
- Equipment level
- Removing and installing. Refer to → Chapter "Left and Right Seat Heating Button -E653-/-E654-, Removing and Installing".
6 - Left Seat Heating Button -E653-
- Equipment level
- Removing and installing. Refer to → Chapter "Left and Right Seat Heating Button -E653-/-E654-, Removing and Installing".
7 - Driver Volume Control -E67-
- Removing and installing. Refer to → Communication; Rep. Gr.91; Sound System; Component Location Overview - Sound System.
8 - -Auto Hold- Button -E540-
- Equipment level
- Removing and installing. Refer to → Chapter "Electromechanical Parking Brake Button -E538-/-AUTO HOLD- Button -E540-, Removing and Installing".
Component Location Overview - Controls in Luggage Compartment

1 - Rear Lid Contact Switch
- Removing and installing. Refer to → Chapter "Rear Lid Contact Switch, Removing and Installing".
2 - Release Button In Rear Lid Handle -E234-
- Removing and installing. Refer to → Chapter "Release Button in Rear Lid Handle -E234-, Removing and Installing".
3 - Third Row Button for Backrest Adjustment - in Luggage Compartment
- Left Third Row Button 3 for Backrest Adjustment -E802-, Right Third Row Button 3 for Backrest Adjustment -E805-
- Removing and installing. Refer to → Chapter "Left and Right Third Row Button 3 for Backrest Adjustment -E802-/-E805-, Removing and Installing, Luggage Compartment".
4 - Power Pivoting Trailer Hitch Button -E474-
- Removing and installing. Refer to → Chapter "Loading Sill Lowering Control Head -E682-/Power Pivoting Trailer Hitch Button -E474-, Removing and Installing".
5 - Loading Sill Lowering Control Head -E682-
- With Load Level Button -E539-
- Removing and installing. Refer to → Chapter "Loading Sill Lowering Control Head -E682-/Power Pivoting Trailer Hitch Button -E474-, Removing and Installing".
6 - Third Row Seat Backrest Adjustment Button - Left Rear Door
- Left Third Row Seat Backrest Adjustment Button -E565-, Right Third Row Seat Backrest Adjustment Button -E549-
- Removing and installing. Refer to → Chapter "Left and Right Third Row Seat Backrest Adjustment Button -E565-/-E549-, Removing and Installing, Left Rear Door".
7 - Rear Lid Warning Buzzer -H32-
- The buzzer is activated by closing the rear lid using the rear lid remote release button in the front door
- Removing and installing. Refer to → Chapter "Rear Lid Warning Buzzer -H32-, Removing and Installing".
8 - Expanding Clip
9 - Third Row Seat Backrest Adjustment Button - Right Rear Door
- Left Third Row Button 2 for Backrest Adjustment -E801-, Right Third Row Button 2 for Backrest Adjustment -E804-
- Removing and installing. Refer to → Chapter "Left and Right Third Row Button 2 for Backrest Adjustment -E801-/-E804-, Removing and Installing, Right Rear Door".
10 - Rear Lid Lock Button in Luggage Compartment -E406-
- Versions with Locking Mechanism Button in the Rear Lid -E806-.
- Removing and installing. Refer to → Chapter "Rear Lid Lock Button in Luggage Compartment -E406-, Removing and Installing".
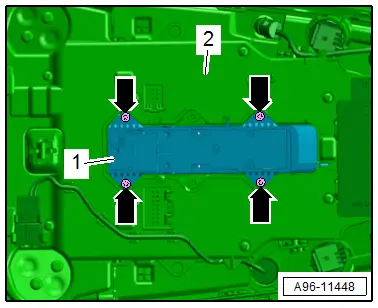
Tightening Specification for Third Row Button for Backrest Adjustment - in Luggage Compartment
- Tighten the bolt -arrow- to 3 Nm.
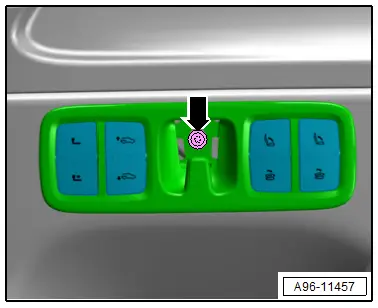
Tightening Specification: Anti-Theft Protection to Release Button In Rear Lid Handle -E234-
- Tighten the nuts -arrows- to 6 Nm.
Component Location Overview - Controls in Roof Trim Panel
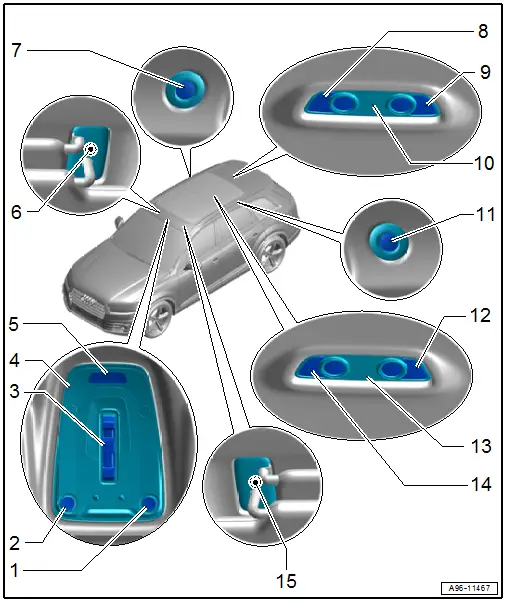
1 - Front Passenger Reading Lamp Button -E458-
- Integrated in the front roof module
2 - Driver Reading Lamp Button -E457-
- Integrated in the front roof module
3 - Sunroof Button -E325- with Roof Shade Button 1 -E584-
- Removing and installing. Refer to → Chapter "Sunroof Button -E325-, Removing and Installing".
4 - Front Roof Module -WX3-
- Removing and installing. Refer to → Chapter "Front Interior Lamp/Reading Lamp, Removing and Installing".
5 - Garage Door Opener Control Head -E284-
- Removing and installing. Refer to → Chapter "Garage Door Opener Control Head -E284-, Removing and Installing".
6 - Front Passenger Vanity Mirror Lamp Contact Switch -F148-
- Integrated in the sun visor mount
- Cannot be replaced separately
- If faulty replace the sun visor. Refer to → Body Interior; Rep. Gr.68; Equipment; Sun Visor, Removing and Installing.
7 - Rear Interior Lamp
- For versions with panorama sliding sunroof
- With Right Rear Reading Lamp Switch 1 -E455-
- Removing and installing. Refer to → Chapter "Rear Interior Lamp/Reading Lamp, Removing and Installing, Vehicles with Panorama Sliding Sunroof".
8 - Right Third Row Reading Lamp Button -E789-
9 - Left Third Row Reading Lamp Button -E696-
10 - Rear Interior Lamp
- For the third row equipment level.
- Removing and installing. Refer to → Chapter "Rear Interior Lamp/Reading Lamp, Removing and Installing".
11 - Rear Interior Lamp
- For versions with panorama sliding sunroof
- With Left Rear Reading Lamp Switch -E454-
- Removing and installing. Refer to → Chapter "Rear Interior Lamp/Reading Lamp, Removing and Installing, Vehicles with Panorama Sliding Sunroof".
12 - Right Rear Reading Lamp Switch 1 -E455-
13 - Rear Interior Lamp
- For versions without panorama sliding sunroof, second row of seats
- Removing and installing. Refer to → Chapter "Rear Interior Lamp/Reading Lamp, Removing and Installing".
14 - Left Rear Reading Lamp Switch -E454-
15 - Driver Vanity Mirror Lamp Contact Switch -F147-
- Integrated in the sun visor mount
- Cannot be replaced separately
- If faulty replace the sun visor. Refer to → Body Interior; Rep. Gr.68; Equipment; Sun Visor, Removing and Installing.
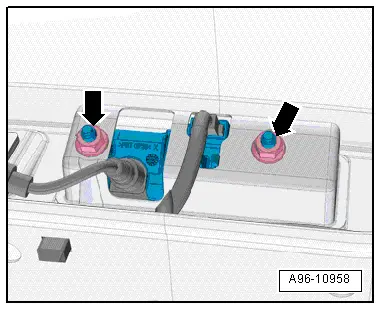
Sunroof Button -E325- Tightening Specification:
- Tighten the screws -arrows- to 0.65 Nm.