Audi Q7: Component Location Overview - Door Ambient Lighting
Component Location Overview - Front Door Ambient Lighting
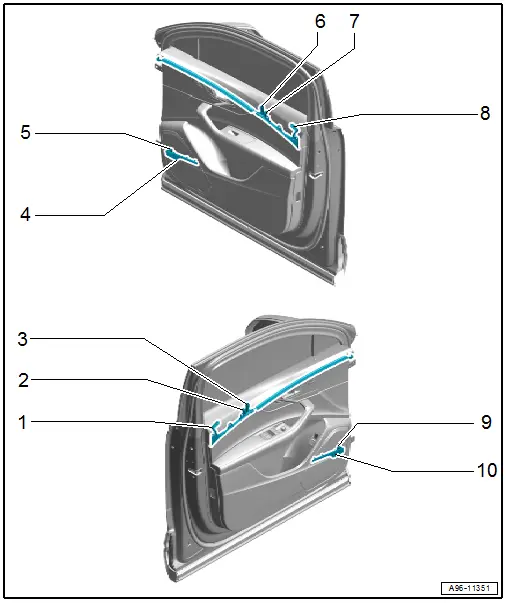
1 - Left Front Door Contour Illumination Lamp
- Removing and installing. Refer to → Chapter "Left Front Door Contour Illumination Lamp, Removing and Installing".
2 - Left Front Door Ambient Lighting Bulb 1
- Removing and installing. Refer to → Chapter "Ambient Lighting Lamp 1, Removing and Installing".
3 - Driver Side Door Ambient Illumination Lamp 2
- Removing and installing. Refer to → Chapter "Door Ambient Illumination Lamp 2, Removing and Installing".
4 - Front Passenger Side Door Speaker Trim Lighting Strip
- Removing and installing. Refer to → Chapter "Lamp for Driver and Passenger Side Door Speaker Trim -L223-/-L224-, Removing and Installing".
5 - Lamp for Passenger Side Door Speaker Trim -L223-
- Removing and installing. Refer to → Chapter "Lamp for Driver and Passenger Side Door Speaker Trim -L223-/-L224-, Removing and Installing".
6 - Front Passenger Side Door Ambient Illumination Lamp 2
- Removing and installing. Refer to → Chapter "Door Ambient Illumination Lamp 2, Removing and Installing".
7 - Right Front Door Ambient Lighting Bulb 1
- Removing and installing. Refer to → Chapter "Ambient Lighting Lamp 1, Removing and Installing".
8 - Right Front Door Contour Illumination Lamp
- Removing and installing. Refer to → Chapter "Left Front Door Contour Illumination Lamp, Removing and Installing".
9 - Lamp for Driver Side Door Speaker Trim -L223-
- Removing and installing. Refer to → Chapter "Lamp for Driver and Passenger Side Door Speaker Trim -L223-/-L224-, Removing and Installing".
10 - Driver Side Door Speaker Trim Lighting Strip
- Removing and installing. Refer to → Chapter "Lamp for Driver and Passenger Side Door Speaker Trim -L223-/-L224-, Removing and Installing".
Component Location Overview - Rear Door Ambient Lighting
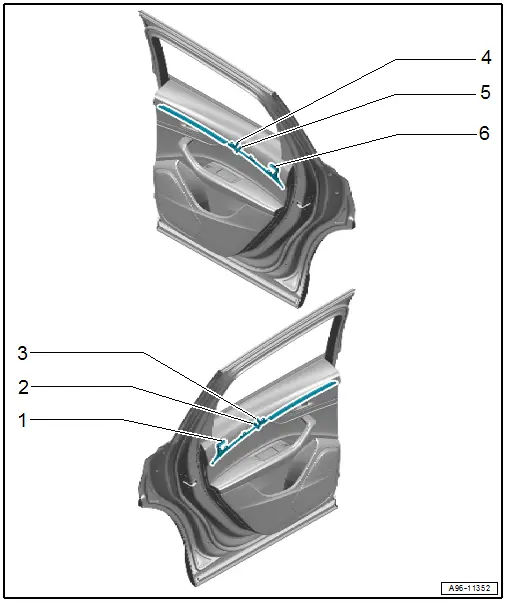
1 - Left Rear Door Contour Illumination Lamp
- Removing and installing. Refer to → Chapter "Left Rear Door Contour Illumination Lamp, Removing and Installing".
2 - Left Rear Door Ambient Lighting Bulb 1
- Removing and installing. Refer to → Chapter "Rear Door Ambient Lighting Lamp 1, Removing and Installing".
3 - Driver Side Rear Door Ambient Illumination Lamp 2
- Removing and installing. Refer to → Chapter "Rear Door Ambient Illumination Lamp 2, Removing and Installing".
4 - Front Passenger Side Rear Door Ambient Illumination Lamp 2
- Removing and installing. Refer to → Chapter "Rear Door Ambient Illumination Lamp 2, Removing and Installing".
5 - Right Rear Door Ambient Lighting Bulb 1
- Removing and installing. Refer to → Chapter "Rear Door Ambient Lighting Lamp 1, Removing and Installing".
6 - Right Rear Door Contour Illumination Lamp
- Removing and installing. Refer to → Chapter "Left Rear Door Contour Illumination Lamp, Removing and Installing".
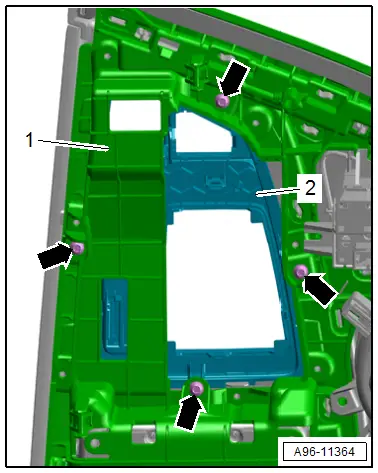
Component Location Overview - Center Console Lamps
Component Location Overview - Center Console Lamps
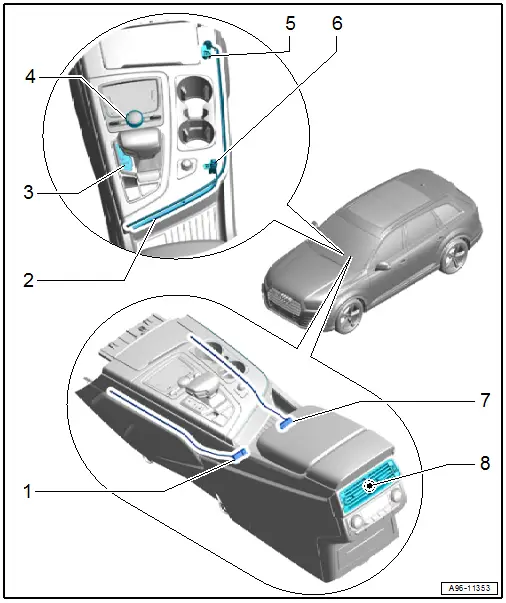
1 - Fiber Optic Cable for Front Center Console Ambient Lighting -W74-, Left
- Removing and installing. Refer to → Chapter "Fiber Optic Cable for Front Center Console Ambient Lighting -W74-, Removing and Installing".
2 - Fiber-Optic Cable
- For the rear center console ambient lighting
- Removing and installing. Refer to → Chapter "Rear Center Console Ambient Lighting Bulb 1 -L197-, Removing and Installing".
3 - Selector Lever Transmission Range Display -Y5-
- Removing and installing. Refer to → Chapter "Selector Lever Transmission Range Display -Y5-, Removing and Installing".
4 - Multimedia System Control Head Contour Illumination Lamp 1 -L233-
- If an LED is faulty, then the multimedia system control head must be replaced
5 - Front Center Console Ambient Lighting Bulb 1 -L193-
- Removing and installing. Refer to → Chapter "Front Center Console Ambient Lighting Bulb 1 -L193-, Removing and Installing".
6 - Rear Center Console Ambient Lighting Bulb 1 -L197-
- Removing and installing. Refer to → Chapter "Rear Center Console Ambient Lighting Bulb 1 -L197-, Removing and Installing".
7 - Fiber Optic Cable for Front Center Console Ambient Lighting -W74-, Right
- Removing and installing. Refer to → Chapter "Fiber Optic Cable for Front Center Console Ambient Lighting -W74-, Removing and Installing".
8 - Rear Center Air Vent Illumination Bulb -L87-
- Cannot be replaced separately if faulty.
- Replacing. Refer to → Body Interior; Rep. Gr.68; Center Console; Overview - Center Console.
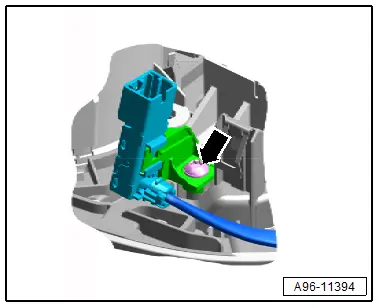
Tightening Specification of Center Console Ambient Lighting Lamps
- Tighten the bolt -arrow- to 1.2 Nm.
Tightening Specification Selector Lever Transmission Range Display -Y5-
- Tighten the bolts -arrows- to 1.1 Nm.
Component Location Overview - Lamps in Center Console, Seats and B-Pillar

1 - Left Rear Footwell Lamp -W45-
- Removing and installing. Refer to → Chapter "Left and Right Rear Footwell Lamp -W45-/-W46-, Removing and Installing".
2 - Left B-Pillar Vent
- Vehicles with Left Rear Air Vent Illumination Bulb -L88-
- Cannot be replaced separately if faulty.
- Replacing. Refer to → Body Interior; Rep. Gr.70; Vehicle Interior Trim Panels; Overview - B-Pillar Trim Panel.
3 - Right B-Pillar Vent
- Vehicles with Right Rear Air Vent Illumination Bulb -L89-
- Cannot be replaced separately if faulty.
- Replacing. Refer to → Body Interior; Rep. Gr.70; Vehicle Interior Trim Panels; Overview - B-Pillar Trim Panel.
4 - Right Rear Footwell Lamp -W46-
- Removing and installing. Refer to → Chapter "Left and Right Rear Footwell Lamp -W45-/-W46-, Removing and Installing".
Component Location Overview - Luggage Compartment Lamps
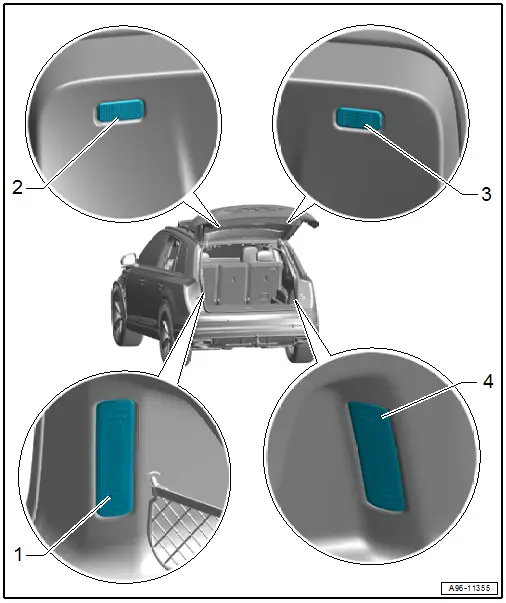
1 - Left Luggage Compartment Lamp -W18-
- In the left luggage compartment trim panel
- Removing and installing. Refer to → Chapter "Left and Right Luggage Compartment Lamp -W18-/-W35-, Removing and Installing".
2 - Rear Lid Courtesy Lamp -W51-
- Removing and installing. Refer to → Chapter "Rear Lid Lamps -W51-/-W101-, Removing and Installing".
3 - Rear Lid Lamp 2 -W101-
- Removing and installing. Refer to → Chapter "Rear Lid Lamps -W51-/-W101-, Removing and Installing".
4 - Right Luggage Compartment Lamp -W35-
- In the right luggage compartment trim panel
- Removing and installing. Refer to → Chapter "Left and Right Luggage Compartment Lamp -W18-/-W35-, Removing and Installing".
Component Location Overview - Roof Trim Panel Lamps
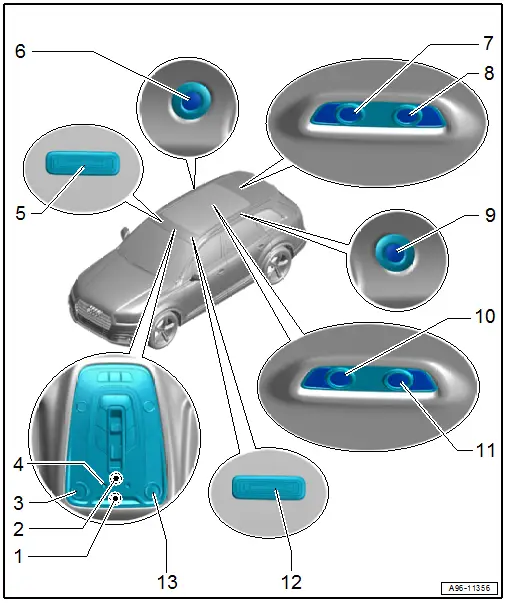
1 - Front Passenger Airbag -Disabled- Indicator Lamp -K145-
- The front roof module must be replaced if an indicator lamp is faulty. Refer to → Chapter "Front Interior Lamp/Reading Lamp, Removing and Installing".
2 - Front Interior Lamp -W1-
- The front roof module must be replaced if an LED is faulty. Refer to → Chapter "Front Interior Lamp/Reading Lamp, Removing and Installing".
3 - Driver Reading Lamp -W19-
- The front roof module must be replaced if an LED is faulty. Refer to → Chapter "Front Interior Lamp/Reading Lamp, Removing and Installing".
4 - Ambient Lighting
- The front roof module must be replaced if an LED is faulty. Refer to → Chapter "Front Interior Lamp/Reading Lamp, Removing and Installing".
5 - Front Passenger Vanity Mirror Lamp -W14-
- Removing and installing. Refer to → Chapter "Driver and Front Passenger Vanity Mirror Lamp -W20-/-W14-, Removing and Installing".
6 - Right Rear Interior Lamp -W48-
- For versions with panorama sliding sunroof
- The rear interior lamp must be replaced if one of the LEDs is faulty. Refer to → Chapter "Rear Interior Lamp/Reading Lamp, Removing and Installing, Vehicles with Panorama Sliding Sunroof".
7 - Left Third Row Reading Lamp -W94-
- The rear interior lamp must be replaced if one of the LEDs is faulty. Refer to → Chapter "Rear Interior Lamp/Reading Lamp, Removing and Installing".
8 - Right Third Row Reading Lamp -W95-
- The rear interior lamp must be replaced if one of the LEDs is faulty. Refer to → Chapter "Rear Interior Lamp/Reading Lamp, Removing and Installing".
9 - Left Rear Interior Lamp -W47-
- For versions with panorama sliding sunroof
- The rear interior lamp must be replaced if one of the LEDs is faulty. Refer to → Chapter "Rear Interior Lamp/Reading Lamp, Removing and Installing, Vehicles with Panorama Sliding Sunroof".
10 - Left Rear Interior Lamp -W47-
- For versions without panorama sliding sunroof
- The rear interior lamp must be replaced if one of the LEDs is faulty. Refer to → Chapter "Rear Interior Lamp/Reading Lamp, Removing and Installing".
11 - Right Rear Interior Lamp -W48-
- For versions without panorama sliding sunroof
- The rear interior lamp must be replaced if one of the LEDs is faulty. Refer to → Chapter "Rear Interior Lamp/Reading Lamp, Removing and Installing".
12 - Driver Vanity Mirror Lamp -W20-
- Removing and installing. Refer to → Chapter "Driver and Front Passenger Vanity Mirror Lamp -W20-/-W14-, Removing and Installing".
13 - Front Passenger Reading Lamp -W13-
- The front roof module must be replaced if an LED is faulty. Refer to → Chapter "Front Interior Lamp/Reading Lamp, Removing and Installing".

