Audi Q7: Localizing Malfunction for Ice Build-Up on Evaporator
 Note
Note
Depending on vehicle equipment, there are different versions of the A/C system for the Audi Q7. Make sure to use the correct version and pay attention to the allocation of different components. Refer to → Chapter "A/C System Versions" and Parts Catalog.
- The A/C Compressor Regulator Valve -N280- is activated from the Front A/C Display Control Head -E87- so that the temperature of the air after the evaporator in the front heater and A/C unit and the specified value (approximately 2 to 5 ºC (35.6 to 41 ºF) ).
- After vehicle start, a value greater than 0.55 A is displayed in the relevant measured value of the Front A/C Display Control Head -E87- depending on the measured temperature, the engine speed, and the vehicle voltage. Refer to Vehicle Diagnostic Tester in the "Guided Fault Finding" function. As soon as the temperature measured by the Evaporator Vent Temperature Sensor -G263- approaches the specified value, activation is canceled and the compressor output is thus reduced.
- In the rear heater and A/C unit (only installed on vehicles with a "High" A/C system) no temperature sensor is installed after the evaporator. If the refrigerant flow through this evaporator is too high (for example because the rear expansion valve is open too wide), the evaporator in the rear heater and A/C unit can ice up. Since the air flowing through the evaporator in the rear heater and A/C unit was already dried in the front heater and A/C unit, it usually does not cause icing of this evaporator or only after a long time. If the evaporator in the rear heater and A/C unit does ice up, the air flow from the rear vents will decrease until there is no longer any cooling/heating output in the rear.
Under certain operating conditions, moisture in the refrigerant circuit can lead to ice build-up on the A/C Compressor Regulator Valve -N280- (and on the expansion valves). A/C compressor control is impaired by this icing. The affected evaporator is cooled too intensely and ices up. The freeze-up of the evaporator can be the cause for the following customer complaints:
In the case of icing of the evaporator in the front heater and A/C unit:
- After a long drive, A/C system repeatedly or sporadically fails (no cooling or heating output), after switching off vehicle and after a short time, the A/C system function is OK again.
- After a long drive, the windshield, rear window and/or door windows fog up on the inside. Pressing the "Defrost" button of the Front A/C Display Control Head -E87- does not clear the windshield, rear window, and/or door windows. After turning off the vehicle (or the A/C system) and waiting a short period, the function of the A/C system is OK again.
 Note
Note
Under extreme ambient conditions, ice build-up can occur on the evaporator when certain unfavorable A/C system settings are selected (for example, airflow direction is set to the instrument panel vents and these vents are closed; maximum cooling output selected with low fresh air blower speed). At this setting, air is no longer flowing through the evaporator and is making the temperature at the Evaporator Vent Temperature Sensor -G263- higher than the actual evaporator temperature. It can be assumed for the A/C system regulation that the Evaporator Vent Temperature Sensor -G263- measured value corresponds to the actual evaporator temperature and continues to activate the A/C Compressor Regulator Valve -N280- and the evaporator cools too much.
Checking
- In the "read the measured values" function, check the measured value of the Evaporator Vent Temperature Sensor -G263-. Refer to Vehicle Diagnostic Tester in the "Guided Fault Finding" function.
- If the measured value of the Evaporator Vent Temperature Sensor -G263- is too high under the conditions described by the customer (although the A/C system is working properly, depending on the ambient temperature greater than 10 ºC (50 ºF), for example), check the Evaporator Vent Temperature Sensor -G263- (an incorrect measured value can cause the evaporator to ice up).
- If the measured value of the Evaporator Vent Temperature Sensor -G263- is too low under the operating conditions reported by the customer (at an ambient temperature above 0 ºC (32 ºF), longer when it is lower than 0 ºC (32 ºF) ). Bring the vehicle to a workshop that has the necessary tools and where the work can be performed accordingly by qualified personnel. Refer to → Refrigerant R134a Servicing; Rep. Gr.87; A/C System, General Information. Bring the problems determined to the attention of the workshop.
- Check the refrigerant line "low pressure side" (wide line between the expansion valve and the refrigerant line with the inner heat exchanger), (refer to → Chapter "System Overview - Refrigerant Circuit with Rear Heater and A/C Unit") with the engine running. If this line is thickly iced-up when a problem occurs (a very thin layer of ice is permitted), this indicates that the temperature in the evaporator is too low. Bring the vehicle to a workshop that has the necessary tools and where the work can be performed accordingly by qualified personnel. Refer to → Refrigerant R134a Servicing; Rep. Gr.87; A/C System, General Information. If the A/C compressor control is not OK, then inform the workshop of the problem at hand.
In the case of icing of the evaporator in the rear heater and A/C unit:
- After a long drive, the rear A/C system repeatedly or sporadically fails (no cooling or heating output). After turning off the vehicle and waiting a short period, the A/C system function is OK again.
Check the front (and rear) evaporator if icing is suspected:
- Open the vent in rear center console.
- Open the vents in the left and right B-pillars.
- Start the engine.
- Switch the A/C compressor on by selecting the "Auto" mode on the Front A/C Display Control Head -E87- (the indicator lamps in the AUTO buttons and the A/C MAX button illuminates).
- Via the rotary switch(es) of the Front A/C Display Control Head -E87-, the temperature preselection is set to "cold" (for the driver and front passenger side).
- On the Front A/C Display Control Head -E87- set the lowest possible speed for the Fresh Air Blower -V2- (lowest possible cooling output of the front heater and A/C unit).
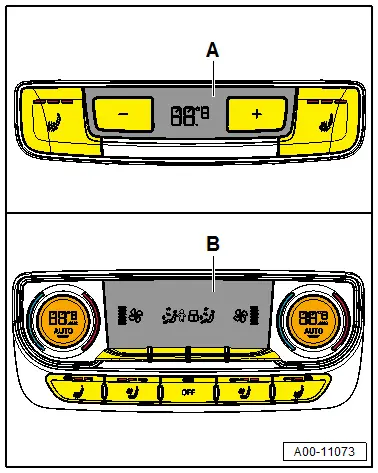
- On vehicles with a "Mid" or "Mix" A/C system on the version -A-Rear A/C Display Control Head -E265- adjust the temperature preset to "cold".
- For vehicles with a "High" A/C system adjust the temperature preset on the version -B-Rear A/C Display Control Head -E265- to "cold" (for the left and right side).
- On the Rear A/C Display Control Head -E265- set the air flow direction via the knob on the Rear A/C Display Control Head -E265- to the vents in the rear center console.
- On vehicles with a "High" A/C system adjust on the version -B-Rear A/C Display Control Head -E265- an average sped for the Rear Fresh Air Blower -V80-.
- Set the engine speed to 2000 RPM.
- In the "read measured values" function, read out the measured value of the Evaporator Vent Temperature Sensor -G263-. Refer to Vehicle Diagnostic Tester in the "Guided Fault Finding" function.
- Use a thermometer to measure the temperature of the air from the vent in the rear center console.
Specified values on a vehicle with a "Mid" or "Mix" A/C system:
 Note
Note
Depending on vehicle equipment, there are different versions of the A/C system for the Audi Q7. Make sure to use the correct version and pay attention to the allocation of different components. Refer to → Chapter "A/C System Versions" and Parts Catalog.
- The measured temperatures for the rear correspond to the temperature measured at the Evaporator Vent Temperature Sensor -G263-, maximum permissible deviation from the measured value at the front +6ºC/- 3ºC (42.8 ºF/26.6 ºF).
 Note
Note
- If the measured value for the air from the vents in the rear center console on a "Low"Mid" or "Mix" A/C system is too low (at an ambient temperature above 0 ºC (32 ºF) or for a longer time colder than 0 ºC (32 ºF) ) check the measured value of the Evaporator Vent Temperature Sensor -G263- and its installation in the front heater and A/C unit. Refer to → Chapter "Evaporator Vent Temperature Sensor -G263-, Removing and Installing".
- If the measured value for the air from the vents in the rear center console is too high, perform the cooling output test. Refer to → Chapter "Malfunction Determination if Cooling Output of Front A/C System is OK but Required Values not Achieved in Rear".
Specified values on a vehicle with a "High" A/C system
- The measured temperatures for the rear correspond to the temperature measured at the Evaporator Vent Temperature Sensor -G263-, maximum permissible deviation from the measured value at the front +6ºC/- 3ºC (42.8 ºF/26.6 ºF) (but not less than +1ºC (33.8 ºF) ).
 Note
Note
- If the measured value for the air from the vents in the rear center console on a "High" A/C system is too low (at an ambient temperature above 0 ºC (32 ºF), longer when it is lower than 0 ºC (32 ºF) ). Bring the vehicle to a workshop that has the necessary tools and where the work can be performed accordingly by qualified personnel. Refer to → Refrigerant R134a Servicing; Rep. Gr.87; A/C System, General Information. Bring the problems determined to the attention of the workshop.
- Check the refrigerant line "low pressure side" (wide line between the rear expansion valve and the refrigerant line with the inner heat exchanger). Refer to → Chapter "System Overview - Refrigerant Circuit with Rear Heater and A/C Unit" with the engine running. If this line is severely iced up when a problem occurs (a thin layer of ice is permitted), this is an indication that the temperature in the rear evaporator is too low. Bring the vehicle to a workshop that has the necessary tools and where the work can be performed accordingly by qualified personnel. Refer to → Refrigerant R134a Servicing; Rep. Gr.87; A/C System, General Information. If the rear expansion valve control is not OK, then inform the workshop of the problem at hand.
In the case of icing in an expansion valve
- After a long drive, the A/C system repeatedly or sporadically fails (no cooling or heating output via the heater and A/C unit upstream from this expansion tank). After turning off the vehicle and waiting a short period, A/C system function is OK again.
- Bring the vehicle to a workshop that has the necessary tools and where the work can be performed by qualified personnel. Refer to → Refrigerant R134a Servicing; Rep. Gr.87; A/C System, General Information.
- Bring the detected problems to the attention of the workshop.

