Audi Q7: Wheels and Tires
This information can be found in the Wheels and Tires repair manual. Refer to → Suspension, Wheels, Steering; Rep. Gr.44; Wheels and Tires.
Tire Pressure Monitoring System
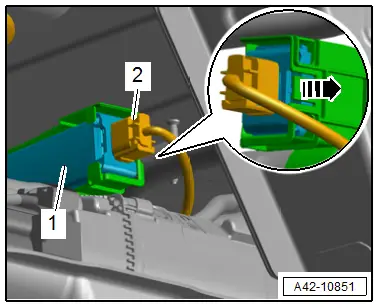
Tire Pressure Monitoring Control Module -J502-, Removing and Installing
Removing
- Component location: on the rear subframe.
- Disconnect the connector -2-.
- Release the catch in direction of -arrow- and remove the Tire Pressure Monitoring Control Module -J502--1- toward the rear.
Installing
Install in reverse order of removal.
Vehicle Alignment
Axle Alignment Information
Wheel alignment must only performed using VW/Audi-approved wheel alignment equipment.
Each time wheels are aligned, both front and rear wheels must be aligned. Otherwise, proper vehicle drive ability cannot be ensured.
 Note
Note
- Axle alignment should not be performed until the vehicle has been driven 1,000-2,000 km, since it takes this long for the suspension to settle.
- The individual specifications should be followed as exactly as possible when making adjustments.
 WARNING
Risk of accident!
If vehicle will be driving on the streets, all bolts and nuts must be tightened properly!
Test Requirements
Follow the general information regarding vehicle alignment. Refer to → Chapter "Axle Alignment Information".
- Vehicle must be cool.
- Check suspension, steering and steering linkage for excessive play and damage, repair if necessary.
- Tread depth difference may be no more than 2 mm on an axle.
- Prescribed tire pressure
- Drive the vehicle onto the alignment rack without tension. Move the vehicle back and forth if necessary to relieve any tension on the axle components.
- Versions with rear axle steering: switch off the ignition when the vehicle has come to a stop. This is the only way to ensure that the rear axle steering is in the straight-ahead position.
- Versions with rear axle steering: check the steering gear rear axle orientation. Refer to → Chapter.
- Vehicle accurately aligned, suspension bounced and rocked several times
- The steering wheel must be "evened out" into the center position before beginning the measuring and adjusting. Use Steering Wheel Scales -VAS6458- for this.
- Vehicles with coil springs in curb weight position, "curb weight position means: the vehicle weight (fuel tank full, as well as the windshield washer fluid reservoir for the windshield/headlamp washer system, spare wheel, vehicle tools and vehicle jack) with without the driver." Refer to → Chapter "Vehicles with Coil Springs, Checking the Curb Weight Position for Axle Alignment".
- Vehicles with air suspension at standard vehicle height: "standard vehicle height means: the vehicle level without the driver". Refer to → Chapter "Standard Vehicle Height for Axle Alignment on Vehicles with Air Suspension, Checking".
- Make sure that the sliding plates and turn tables are not touching the end stop when checking the wheel alignment.
- The measurement sensor must be properly adjusted and attached to the vehicle; observe device manufacturer's operating instructions.
- Perform wheel run-out compensation: permissible axial run-out of the wheel rims can exceed the specified toe setting tolerance. If compensation for wheel run-out is not performed, it will not be possible to obtain a correct toe-in adjustment.
- Vehicle alignment platforms and the alignment equipment/alignment computers can deviate from their original calibration over time therefore they should be calibrated at least once a year during maintenance.
- Handle highly sensitive units with care.
- If necessary, contact the manufacturer for familiarization with the proper use of the equipment.
Measure Preparations
Preparation Work for Calibrating and Adjusting Driver Assist Systems
Perform the following steps using "quick access" if one or more systems on the vehicle will be calibrated/adjusted (without a previous axle alignment):
- Before driving the vehicle onto the alignment stand, make sure there is enough space between the vehicle and the ACC Adjustment Device. Distance between the setting device and the vehicle: 120 cm +- 2.5 cm.
- If there is not sufficient space, drive vehicle backward on alignment stand in order to be able to use the corresponding space.
- Switch off the ignition when the vehicle has come to a stop. Only this way it can be ensured that the is in the straight-ahead position.
- Check the DTC memory and correct any malfunctions before beginning the calibration/adjusting.
- Vehicle accurately aligned, suspension bounced and rocked several times
- Make sure that the sliding plates and turn tables are not touching the end stop when checking the wheel alignment.
- Connect the battery charger for the battery support mode. Refer to → Electrical Equipment; Rep. Gr.27; Battery; Battery, Charging.
- Position the front wheels so they are straight.
- Connect the Vehicle Diagnostic Tester to the vehicle and guide the diagnostic cable through the open window.
- The vehicle exterior lamps are off.
- All the vehicle doors are closed.
- Using the screen, turn on the calibration/adjustment on the wheel alignment computer.
Measure Preparations
Special tools and workshop equipment required
- Vehicle Diagnostic Tester
- Brake Pedal Actuator -VAG1869/2-.
- Steering Wheel Scales -VAS6458-
- Wheel Alignment Computer released by VW/Audi
Test Conditions
- Drive the vehicle onto the alignment rack without tension. Move the vehicle back and forth if necessary to relieve any tension on the axle components.
- The steering wheel must be "evened out" into the center position before beginning the measuring and adjusting. Use Steering Wheel Scales -VAS6458- for this.
- The measurement sensor must be properly adjusted and attached to the vehicle; observe device manufacturer's operating instructions.
- Make sure that the sliding plates and turn tables are not touching the end stop when checking the wheel alignment.
Need for Axle Alignment, Evaluating
When Vehicle Alignment is Necessary
- Vehicle shows handling problems.
- Involved in an accident.
- If axle components were removed and installed or replaced.
- Tire wear patterns are uneven.
After REMOVING and REINSTALLING components.
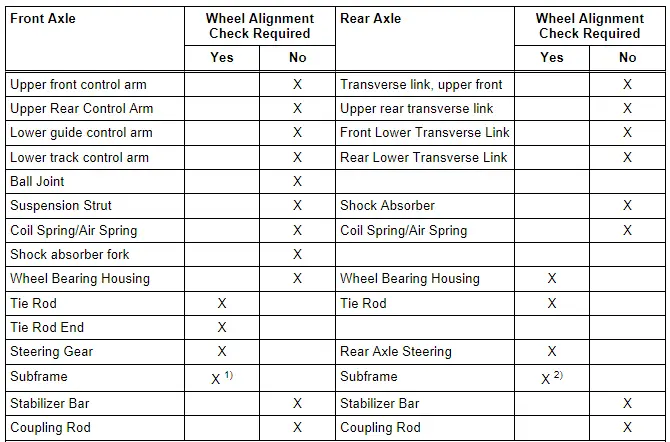
1) Even if the subframe was secured with the locating pins, an axle alignment may be necessary. Perform a road test.
2) Even if the subframe was secured with the locating pins, an axle alignment may be necessary. Perform a road test.
After REPLACING components
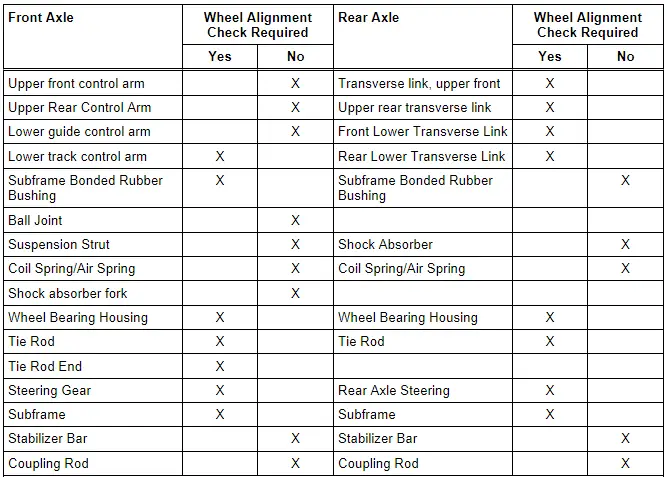
1) Even if the subframe was secured with the locating pins, an axle alignment may be necessary. Perform a road test.

