Audi Q7: Overview - Release Cable
Audi Q7 (4M) 2016-2025 Workshop Manual / Body / Body Exterior / Hood, Lids / Overview - Release Cable
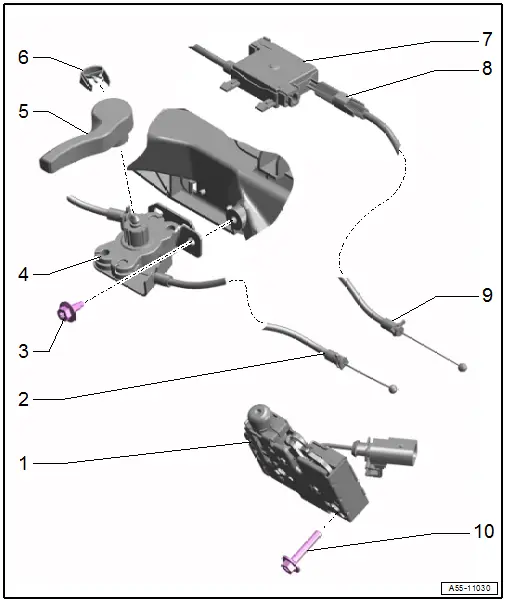
Overview - Release in Vehicle Interior
1 - Operating Lever
- For the latch
- Removing and Installing. Refer to → Chapter "Latch Release Lever, Removing and Installing".
2 - Bolt
- 2 Nm
- Quantity: 2
3 - Mounting Bracket
- For latch release lever
- Removing and Installing. Refer to → Chapter "Latch Release Lever Mounting Bracket, Removing and Installing".
4 - Expanding Nut
- Quantity: 2
5 - Release Cable
- For latch release lever
- Removing and Installing. Refer to → Chapter "Latch Release Lever Release Cable, Removing and Installing".
6 - Grommet
- Check for proper seating
- If damaged, replace the release cable for the latch operating lever. Refer to → Chapter "Latch Release Lever Release Cable, Removing and Installing".
7 - Clip
- For the release cable
8 - Cap
9 - Release Cable Nipple
- Is inserted in the coupling guide element
10 - Coupling with Release Cables
- For the latches
- Removing and Installing. Refer to → Chapter "Coupling with Latch Release Cables, Removing and Installing".
11 - Adjusting Thumbwheel
- For the release cable
- For adjusting the trigger point for the latches
12 - Clip
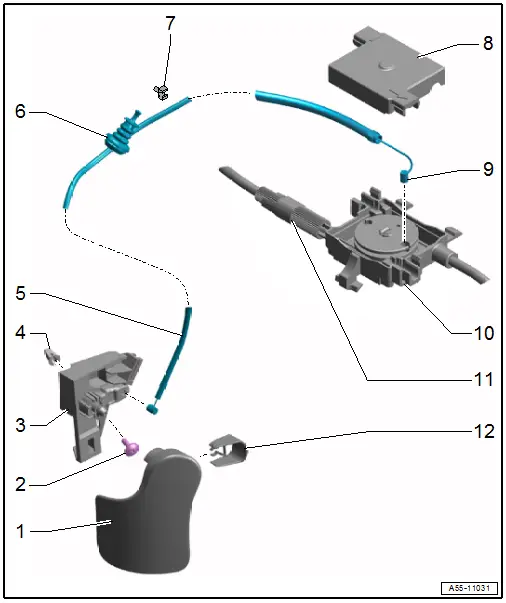
Overview - Release on Latch
1 - Latch
- Removing and Installing. Refer to → Chapter "Latch, Removing and Installing".
2 - Release Cable
- For the hook release lever
- Removing and Installing. Refer to → Chapter "Mounting Bracket with Hook Release Lever Release Cable, Removing and Installing".
3 - Bolt
Vehicles without radiator shutter
- 8 Nm
- Quantity: 2
Vehicles with radiator shutter
- 8 Nm
- Quantity: 3
4 - Mounting Bracket with Release Cable
- There are different versions. Refer to the Parts Catalog.
- For the hook release lever
- Removing and Installing. Refer to → Chapter "Mounting Bracket with Hook Release Lever Release Cable, Removing and Installing".
5 - Hook Release Lever
- Removing and Installing. Refer to → Chapter "Hook Release Lever, Removing and Installing".
6 - Clip
- For the release lever
7 - Coupling with Release Cables
- For the latches
- Removing and Installing. Refer to → Chapter "Coupling with Latch Release Cables, Removing and Installing".
8 - Adjusting Thumbwheel
- For the release cable
- For adjusting the trigger point for the latches
9 - Release Cable
- For releasing the latches
- Removing and Installing. Refer to → Chapter "Coupling with Latch Release Cables, Removing and Installing".
10 - Bolt
- 12 Nm
- Quantity: 2

