Audi Q7: Gear Oil, Checking Level
Gear Oil, Checking Level, Front Final Drive
Special tools and workshop equipment required
- Used Oil Collection and Extraction Unit -SMN372500-
- Pressurized Gearbox Oil Filler Kit -VAS6617-
- Protective Eyewear
Procedure
- Gear oil temperature: approximately 20 ºC (68 ºF) (room temperature).
- Move the vehicle onto a 4-column shop hoist or over a work pit so it is completely level.
- Transmission is in "P".
- The parking brake button is pressed to activate the electro-mechanical parking brake.
 Note
Note
- General repair instructions. Refer to → Chapter "General Repair Information".
- Guidelines for clean working conditions. Refer to → Chapter "Guidelines for Clean Working Conditions".
- Always maintain the specified transmission fluid level; the transmission is very sensitive to overfilling.
- Replace the plug for the inspection and fill hole.
- Remove the center or rear noise insulation. Refer to → Body Exterior; Rep. Gr.66; Noise Insulation; Noise Insulation, Removing and Installing.
- Place the Used Oil Collection and Extraction Unit -SMN372500- under the transmission.
 Note
Note
To catch escaping gear oil, place multiple cloths on the subframe crossbrace.
 WARNING
Danger of eye injury.
Wear protective eyewear.
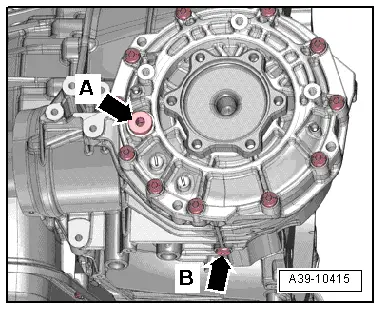
- Remove the fill/check plug -arrow A- from the front final drive.
- Specified value: The oil level is correct when the front final drive is filled to the lower edge of the filler opening.
- Let any excess oil drain.
If the Level Does Not Reach the Bottom of the Oil Fill Hole in the Front Final Drive:
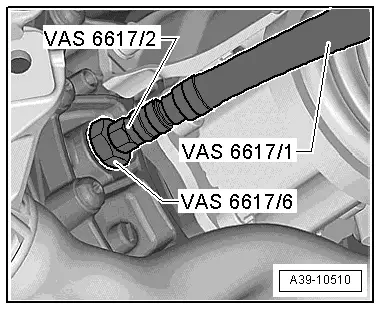
- Install the Pressurized Gearbox Oil Filler - Adapter 6 -VAS6617/6- with the Pressurized Gearbox Oil Filler - Adapter 2 -VAS6617/2- in the inspection and fill hole in the front final drive.
- Connect the Pressurized Gearbox Oil Filler Kit -VAS6617- and fill the front final drive with gear oil.
- Transmission fluid. Refer to the Parts Catalog.
- Remove the Pressurized Gearbox Oil Filler - Adapter 6 -VAS6617/6- from the transmission and let any extra gear oil drain out.
- Tighten the new fill/check plug -arrow A- for the front final drive.
- Remove the cloth from the subframe crossbrace.

Tightening Specifications
- Refer to → Body Exterior; Rep. Gr.66; Noise Insulation; Overview - Noise Insulation.
Gear Oil, Checking Level, Transfer Case
Special tools and workshop equipment required
- Used Oil Collection and Extraction Unit -SMN372500-
- Pressurized Gearbox Oil Filler Kit -VAS6617-
- Protective Eyewear
Procedure
- Gear oil temperature: approximately 20 ºC (68 ºF) (room temperature).
- Move the vehicle onto a 4-column shop hoist or over a work pit so it is completely level.
- Transmission is in "P".
- The parking brake button is pressed to activate the electro-mechanical parking brake.
- The transmission must be still for at least 15 minutes to make sure the oil settles internally.
 Note
Note
- General repair instructions. Refer to → Chapter "General Repair Information".
- Guidelines for clean working conditions. Refer to → Chapter "Guidelines for Clean Working Conditions".
- Replace the plug for the inspection and fill hole.
- Place the Used Oil Collection and Extraction Unit -SMN372500- under the transmission.
 Note
Note
To catch escaping gear oil place multiple cloths around the tunnel crossmember.
 WARNING
Danger of eye injury.
Wear protective eyewear.
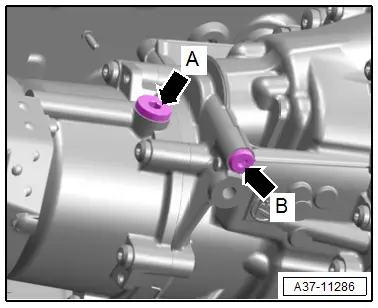
- Remove the fill/check plug -arrow A- from the center differential housing.
- Specified value: The oil level is correct when the transfer case is filled to the lower edge of the filler opening.
- Let any excess oil drain.
If the Level in the Transfer Case Does Not Reach the Lower Edge of the Oil Fill Hole:
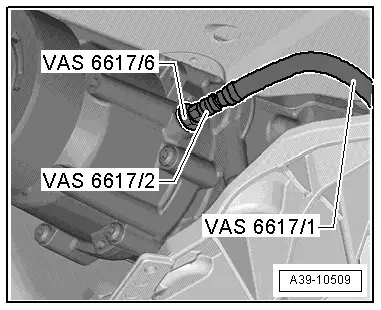
- Install the Pressurized Gearbox Oil Filler - Adapter 6 -VAS6617/6- with the Pressurized Gearbox Oil Filler - Adapter 2 -VAS6617/2- in the inspection and fill hole in the transfer case hand-tight.
- Connect the Pressurized Gearbox Oil Filler Kit -VAS6617- and fill the transfer case with gear oil.
- Transmission fluid. Refer to the Parts Catalog.
- Wait five minutes.
 Note
Note
- The inside of the transfer case is divided into several oil chambers. The chambers must be filled equally.
- A waiting time of at least five minutes is required so that the internal oil level between the center differential and oil fill space can equalize.
- Remove the Pressurized Gearbox Oil Filler - Adapter 6 -VAS6617/6- from the transmission and let any extra gear oil drain out.
- Tighten the new fill/check plug -arrow A- for the center differential housing.
- Remove the cloth from the tunnel crossmember.


