Audi Q7: Overview - Front Actuators
Overview - Front Left Actuators
 Note
Note
- Depending on vehicle equipment, there are different versions of the A/C system for the Audi Q7. Make sure to use the correct version and pay attention to the allocation of different components. Refer to → Chapter "A/C System Versions" and Parts Catalog.
- Depending on the production date, there can be different versions of the levers and fasteners on the heater and A/C unit. Refer to the Parts Catalog.
- Apply a small amount of grease to the cam plate guides, the shaft bearings, the toothed segment as well as to the pins on the door levers. Refer to Parts Catalog.
 Caution
Interchange of the wire connections to the temperature sensors or the connectors at the adjustment motors results in problems regarding the regulation of the A/C system.
- Interchanged connectors at the adjustment motors or the temperature sensors are not identified as malfunctions by the Front A/C Display Control Head -E87-.
- Prior to disconnecting connectors or removing electrical components, clearly label them in order to rule out confusion.
Left Actuators (on a "Low" or "Mid" A/C System)
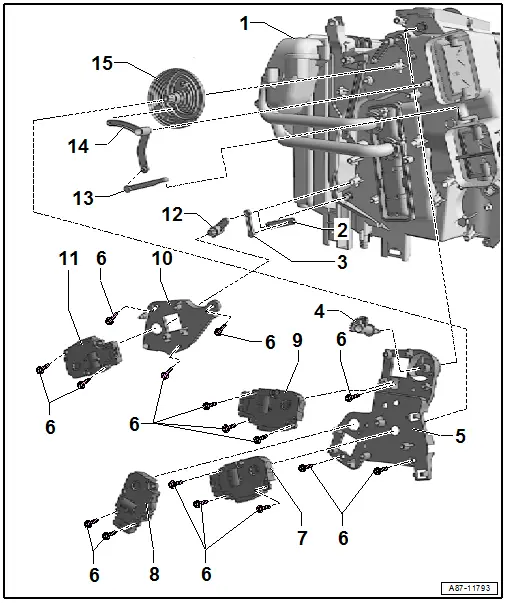
1 - Heater and A/C Unit ("Low" or "Mid" A/C System)
- View of left side of air distribution housing
2 - Fastener
3 - Fastener
4 - Gear
- This gear is designed with a wide tooth and a long tooth, so that it may join with the other gear in only one position. Refer to → Chapter "Defroster Door Motor -V107-, Removing and Installing".
- Refer to → Chapter "Bracket for Left Adjustment Motors, Removing and Installing (on a Mix or High A/C System)"
5 - Bracket for Left Actuators
- Do not remove because of the curved washer installed behind it
- Refer to → Chapter "Bracket for Left Adjustment Motors, Removing and Installing (on a LowMid A/C System)"
6 - Bolt
- Tightening specification 1 Nm
7 - Left Side Vent Motor -V299-
- Refer to → Chapter "Left Side Vent Motor -V299-, Removing and Installing"
8 - Left Temperature Control Door Motor -V158-
- Refer to → Chapter "Left Temperature Control Door Motor -V158-, Removing and Installing"
9 - Defroster Door Motor -V107-
- Refer to → Chapter "Defroster Door Motor -V107-, Removing and Installing"
 Note
Note
On right-hand drive vehicles, the Defroster Door Motor -V107- is not on the left side, but rather on the right side of the heater and A/C unit. Refer to → Chapter "Defroster Door Motor -V107-, Removing and Installing".
10 - Bracket for Rear Temperature Door Motor -V137-
- Refer to → Chapter "Rear Temperature Door Motor -V137- Bracket, Removing and Installing".
11 - Temperature Regulator Control Door Motor -V137-
- Refer to → Chapter "Rear Temperature Control Door Motor -V137-, Removing and Installing"
12 - Lever
13 - Fastener
- Do not remove because of the connection to the curved washer
14 - Lever
- Do not remove because of the connection to the curved washer
15 - Curved Washer
- Do not remove because of the connection to the levers
Left Actuators ("Mix" or "High" A/C System)
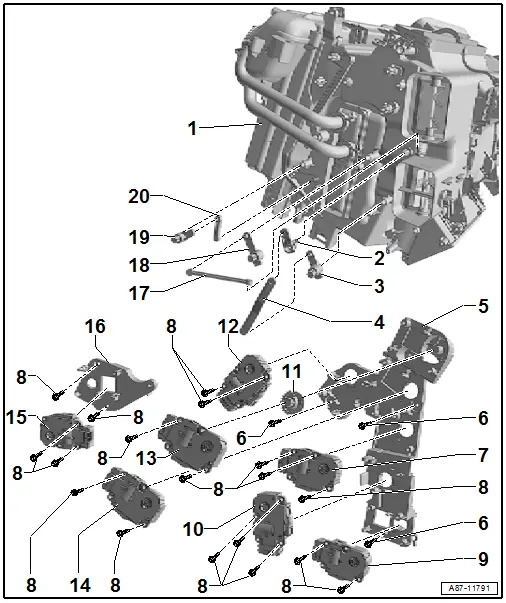
1 - Heater and A/C Unit ("Mix" or "High" A/C System)
- View of left side of air distribution housing
2 - Lever
3 - Lever
4 - Fastener
5 - Bracket for Left Actuators
- Refer to → Chapter "Bracket for Left Adjustment Motors, Removing and Installing (on a Mix or High A/C System)"
6 - Bolt
- Tightening specification 1 Nm
7 - Left Side Vent Motor -V299-
- Refer to → Chapter "Left Side Vent Motor -V299-, Removing and Installing"
8 - Bolt
- Tightening specification 1 Nm
9 - Left Footwell Temperature Control Door Motor -V411-
- Refer to → Chapter "Left Footwell Temperature Control Door Motor -V411-, Removing and Installing"
10 - Left Footwell Door Motor -V108-
- Refer to → Chapter "Left Footwell Door Motor -V108-, Removing and Installing"
11 - Gear
- This gear is designed with a wide tooth and a long tooth, so that it may join with the other gear in only one position. Refer to → Chapter "Defroster Door Motor -V107-, Removing and Installing".
- Refer to → Chapter "Bracket for Left Adjustment Motors, Removing and Installing (on a Mix or High A/C System)"
12 - Left Temperature Control Door Motor -V158-
- Refer to → Chapter "Left Temperature Control Door Motor -V158-, Removing and Installing"
13 - Defroster Door Motor -V107-
- Refer to → Chapter "Defroster Door Motor -V107-, Removing and Installing"
 Note
Note
On right-hand drive vehicles, the Defroster Door Motor -V107- is not on the left side, but rather on the right side of the heater and A/C unit. Refer to → Chapter "Defroster Door Motor -V107-, Removing and Installing".
14 - Left Center Vent Motor -V110-
- Refer to → Chapter "Left Center Vent Motor -V110-, Removing and Installing"
15 - Temperature Regulator Control Door Motor -V137-
- Refer to → Chapter "Rear Temperature Control Door Motor -V137-, Removing and Installing"
16 - Bracket for Rear Temperature Door Motor -V137-
- Refer to → Chapter "Rear Temperature Door Motor -V137- Bracket, Removing and Installing".
17 - Fastener
18 - Lever
19 - Lever
20 - Fastener
Overview - Right Front Actuators
 Note
Note
- Depending on vehicle equipment, there are different versions of the A/C system for the Audi Q7. Make sure to use the correct version and pay attention to the allocation of different components. Refer to → Chapter "A/C System Versions" and Parts Catalog.
- Depending on the production date, there can be different versions of the levers and fasteners on the heater and A/C unit. Refer to the Parts Catalog.
- Apply a small amount of grease to the cam plate guides, the shaft bearings, the toothed segment as well as to the pins on the door levers. Refer to Parts Catalog.
 Caution
Interchange of the wire connections to the temperature sensors or the connectors at the adjustment motors results in problems regarding the regulation of the A/C system.
- Interchanged connectors at the adjustment motors or the temperature sensors are not identified as malfunctions by the Front A/C Display Control Head -E87-.
- Prior to disconnecting connectors or removing electrical components, clearly label them in order to rule out confusion.
Right Actuators ("Low" or "Mid" A/C system)
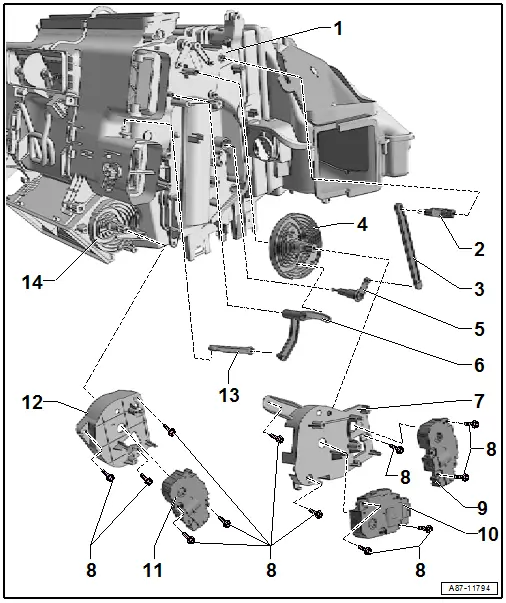
1 - Heater and A/C Unit ("Low" or "Mid" A/C System)
- View of right side of air distribution housing
2 - Fastener
- Do not remove because of the connection to the curved washer
3 - Fastener
- Do not remove because of the connection to the curved washer
4 - Curved Washer
- Do not remove because of the connection to the levers
5 - Lever
- Do not remove because of the connection to the curved washer
6 - Lever
- Do not remove because of the connection to the curved washer
7 - Bracket for Right Actuators
- Do not remove because of the curved washer installed behind it
- Refer to → Chapter "Bracket for Right Adjustment Motors, Removing and Installing (on a Low or Mid A/C System)"
8 - Bolt
- Tightening specification 1 Nm
9 - Right Temperature Control Door Motor -V159-
- Refer to → Chapter "Right Temperature Control Door Motor -V159-, Removing and Installing"
10 - Side Vent Motor -V300-
- Refer to → Chapter "Right Side Vent Motor -V300-, Removing and Installing"
11 - Rear Air Distribution Door Motor -V427- / Rear Air Quantity Motor -V443-
- Refer to → Chapter "Rear Air Distribution Door Motor -V427- and Rear Air Quantity Motor -V443-, Removing and Installing"
 Note
Note
There are different names for these motors depending on the version of the A/C system (Rear Air Distribution Door Motor -V427- for a "Low" or "Mid" A/C system and Rear Air Quantity Motor -V443- for a "Mix" or "High" A/C system) and have the same component location.
12 - Rear Air Distribution Door Motor -V427- / Rear Air Quantity Motor -V443-
- Do not remove because of the curved washer installed behind it
- Refer to → Chapter "Rear Air Distribution Door Motor -V427- and Rear Air Quantity Motor -V443-, Removing and Installing"
 Note
Note
There are different names for these motors depending on the version of the A/C system (Rear Air Distribution Door Motor -V427- assignment of 3-way connector for a "Low" or "Mid"A/C system and Rear Air Quantity Motor -V443- for a "Mix" or "High" A/C system) and have the same component location.
13 - Fastener
- Do not remove because of the connection to the levers and the curved washer
14 - Curved Washer
- Do not remove because of the connection to the levers
Right Actuators ("Mix" or "High" A/C System)
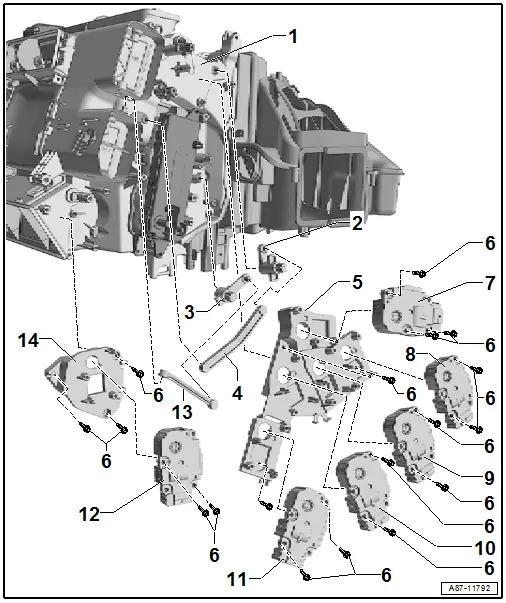
1 - Heater and A/C Unit ("Mix" or "High" A/C System)
- View of right side of air distribution housing
2 - Lever
3 - Lever
4 - Fastener
5 - Bracket for Right Actuators
- Refer to → Chapter "Bracket for Right Adjustment Motors, Removing and Installing (on a Mix or High A/C System)"
6 - Bolt
- Tightening specification 1 Nm
7 - Center Vent Adjustment Motor -V111-
- Refer to → Chapter "Right Center Vent Motor -V111-, Removing and Installing"
8 - Right Temperature Control Door Motor -V159-
- Refer to → Chapter "Right Temperature Control Door Motor -V159-, Removing and Installing"
9 - Right Footwell Temperature Control Door Motor -V412-
- Refer to → Chapter "Right Footwell Temperature Control Door Motor -V412-, Removing and Installing"
- Refer to → Chapter "Bracket for Right Adjustment Motors, Removing and Installing (on a Mix or High A/C System)"
10 - Side Vent Motor -V300-
- Refer to → Chapter "Right Side Vent Motor -V300-, Removing and Installing"
11 - Right Footwell Door Motor -V109-
- Refer to → Chapter "Right Footwell Door Motor -V109-, Removing and Installing"
12 - Rear Air Distribution Door Motor -V427- / Rear Air Quantity Motor -V443-
 Note
Note
There are different names for these motors depending on the version of the A/C system (Rear Air Distribution Door Motor -V427- for a "Low" or "Mid"A/C system and Rear Air Quantity Motor -V443- for a "Mix" or "High" A/C system) and have the same component location.
- Refer to → Chapter "Rear Air Distribution Door Motor -V427- and Rear Air Quantity Motor -V443-, Removing and Installing"
13 - Fastener
14 - Rear Air Distribution Door Motor -V427- / Rear Air Quantity Motor -V443-
- Refer to → Chapter "Rear Air Distribution Door Motor -V427- and Rear Air Quantity Motor -V443-, Removing and Installing"
 Note
Note
There are different names for these motors depending on the version of the A/C system (Rear Air Distribution Door Motor -V427- for a "Low" or "Mid"A/C system and Rear Air Quantity Motor -V443- for a "Mix" or "High" A/C system) and have the same component location.
Overview - Actuators on Air Intake Housing
 Note
Note
- Depending on the production date, there can be different versions of the levers and fasteners on the heater and A/C unit. Refer to the Parts Catalog.
- Apply a small amount of grease to the cam plate guides, the shaft bearings, the toothed segment as well as to the pins on the door levers. Refer to Parts Catalog.
 Caution
Interchange of the wire connections to the temperature sensors or the connectors at the adjustment motors results in problems regarding the regulation of the A/C system.
- Interchanged connectors at the adjustment motors or the temperature sensors are not identified as malfunctions by the Front A/C Display Control Head -E87-.
- Prior to disconnecting connectors or removing electrical components, clearly label them in order to rule out confusion.
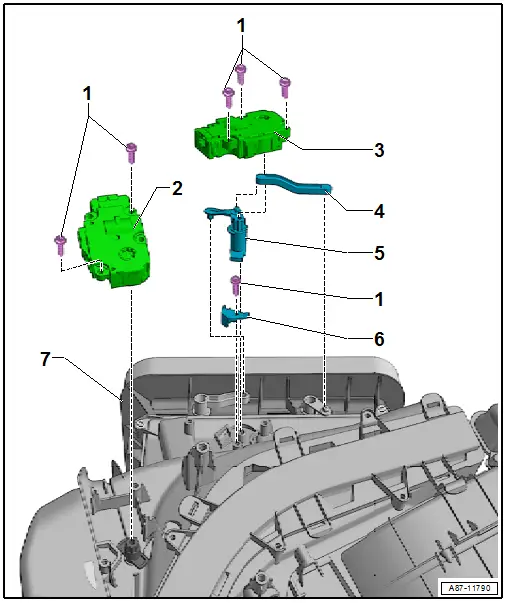
1 - Bolt
- Tightening specification 1 Nm
2 - Recirculation Door Motor -V113-
- Refer to → Chapter "Recirculation Door Motor -V113-, Removing and Installing"
3 - Fresh Air Door Motor -V438-
- Refer to → Chapter "Fresh Air Door Motor -V438- Function, Removing and Installing"
4 - Fastener
5 - Shaft with Lever
6 - Bracket
7 - Air Intake Housing

