Audi Q7: Overview - Rear Adjustment Motor
Rear Air Distribution Housing Actuators and Electrical Components, "Mid" or "Mix" A/C System
 Note
Note
- Depending on vehicle equipment, there are different versions of the A/C system for the Audi Q7. Make sure to use the correct version and pay attention to the allocation of different components. Refer to → Chapter "A/C System Versions" and Parts Catalog.
- Depending on the production date, there can be different versions of the levers and fasteners on the heater and A/C unit. Refer to the Parts Catalog.
- Apply a small amount of grease to the cam plate guides, the shaft bearings, the toothed segment as well as to the pins on the door levers. Refer to Parts Catalog.
 Caution
Interchange of the wire connections to the temperature sensors or the connectors at the adjustment motors results in problems regarding the regulation of the A/C system.
- Interchanged connectors at the adjustment motors or the temperature sensors are not identified as malfunctions by the Front A/C Display Control Head -E87-.
- Prior to disconnecting connectors or removing electrical components, clearly label them in order to rule out confusion.
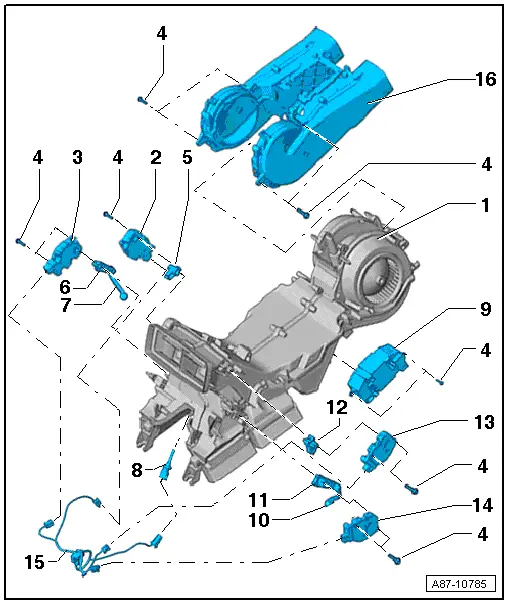
1 - Rear Air Distributor Housing with Rear Fresh Air Blower -V80-
- Rear air distribution housing, removing and installing. Refer to → Chapter "Heater and A/C Unit, Removing and Installing, Mid or Mix A/C System".
- Do not disassemble further (the Rear Fresh Air Blower -V80- is part of the air distribution housing. Refer to the Parts Catalog.
- Check the Rear Fresh Air Blower -V80- function. Refer to Vehicle Diagnostic Tester in the "Guided Fault Finding" function.
 Note
Note
To attach the rear air distribution housing to the center tunnel, brackets engage under the rear air distribution housing. Do not remove them. Refer to → Chapter "Heater and A/C Unit, Removing and Installing, Mid or Mix A/C System".
2 - Left Rear Upper Body Vent Motor -V315-
- Refer to → Chapter "Left Rear Upper Body Vent Motor -V315-"
3 - Left B-Pillar/Footwell Shut-Off Door Motor -V212-
- Refer to → Chapter "Left B-Pillar/Footwell Shut-Off Door Motor -V212-, Removing and Installing"
4 - Bolt
- 1 Nm
5 - Fastener
6 - Actuating Lever
7 - Fastener
8 - Rear Upper Body Vent Temperature Sensor -G537-
- Refer to → Chapter "Rear Upper Body Vent Temperature Sensor -G537-, Removing and Installing"
- Check. Refer to Vehicle Diagnostic Tester in the "Guided Fault Finding" function
 Note
Note
Can only be replaced with the rear air distribution housing removed.
9 - Rear Fresh Air Blower Control Module -J391-
- Refer to → Chapter "Fresh Air Blower Control Module, Removing and Installing "
- Ensure the correct allocation. Refer to the Parts Catalog.
- Check. Refer to Vehicle Diagnostic Tester in the "Guided Fault Finding" function
10 - Fastener
11 - Actuating Lever
12 - Fastener
13 - Right Rear Upper Body Vent Motor -V316-
- Refer to → Chapter "Right Rear Upper Body Vent Motor -V316-"
14 - Right B-Pillar/Footwell Shut-Off Door Motor -V211-
- Refer to → Chapter "Right B-Pillar/Footwell Shut-Off Door Motor -V211-, Removing and Installing"
15 - Wiring Harness at the Rear Air Distribution Housing
16 - Air Duct
- Do not disassemble further. Refer to the Parts Catalog.
Rear Heater and A/C Unit Actuators and Electrical Components, "High" A/C System
 Note
Note
- Depending on vehicle equipment, there are different versions of the A/C system for the Audi Q7. Make sure to use the correct version and pay attention to the allocation of different components. Refer to → Chapter "A/C System Versions" and Parts Catalog.
- Depending on the production date, there can be different versions of the levers and fasteners on the heater and A/C unit. Refer to the Parts Catalog.
- Apply a small amount of grease to the cam plate guides, the shaft bearings, the toothed segment as well as to the pins on the door levers. Refer to Parts Catalog.
 Caution
Interchange of the wire connections to the temperature sensors or the connectors at the adjustment motors results in problems regarding the regulation of the A/C system.
- Interchanged connectors at the adjustment motors or the temperature sensors are not identified as malfunctions by the Front A/C Display Control Head -E87-.
- Prior to disconnecting connectors or removing electrical components, clearly label them in order to rule out confusion.
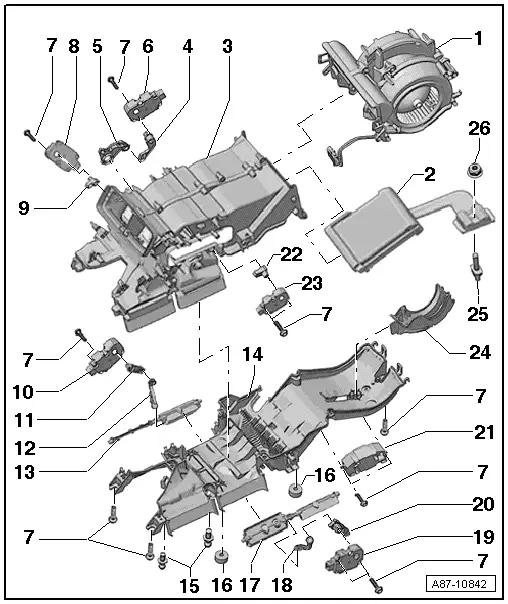
1 - Rear Fresh Air Blower -V80-
- Do not disassemble further
- The version is different for vehicles with a rear air distribution housing and a rear heater and A/C unit.
- Ensure the correct allocation. Refer to the Parts Catalog.
- Check. Refer to Vehicle Diagnostic Tester in the "Guided Fault Finding" function
- Refer to → Chapter "Rear Fresh Air Blower -V80-, Removing and Installing"
2 - Evaporator (with Refrigerant Lines)
3 - Rear Heater and A/C Unit Air Distribution Housing
4 - Coupling Rod
- Mark before removing (risk of interchange)
5 - Curved Washer
- Mark before removing (risk of interchange)
6 - Left Rear Temperature Control Door Motor -V313-
- Refer to → Chapter "Left Rear Temperature Control Door Motor -V313-, Removing and Installing"
- To rule out confusion, clearly label the wire routing, allocation and adjustment motor for each installation location prior to disconnecting the connector or removing an adjustment motor.
7 - Bolt
- 1 Nm
8 - Left Rear Upper Body Vent Motor -V315-
- Refer to → Chapter "Left Rear Upper Body Vent Motor -V315-"
- To rule out confusion, clearly label the wire routing, allocation and adjustment motor for each installation location prior to disconnecting the connector or removing an adjustment motor.
9 - Actuating Lever
- Mark before removing (risk of interchange)
10 - Left B-Pillar/Footwell Shut-Off Door Motor -V212-
- Refer to → Chapter "Left B-Pillar/Footwell Shut-Off Door Motor -V212-, Removing and Installing"
- To rule out confusion, clearly label the wire routing, allocation and adjustment motor for each installation location prior to disconnecting the connector or removing an adjustment motor.
11 - Actuating Lever
- Do not disconnect from the connecting rod
12 - Connecting Rod
- Do not disconnect from the actuating arm and from the doors
13 - Shut-Off Doors in the Vents to the Left B-Pillar and to the Left Footwell
- Do not disconnect from the connecting rod
14 - Lower Section of the Rear Air Distributor Housing
15 - Bracket
16 - Foam Ring
- Replace if damaged
17 - Shut-Off Doors in the Vents to the Right B-Pillar and to the Right Footwell
- Do not disconnect from the connecting rod
18 - Connecting Rod
- Do not disconnect from the actuating arm and from the doors
19 - Right B-Pillar/Footwell Shut-Off Door Motor -V211-
- Refer to → Chapter "Right B-Pillar/Footwell Shut-Off Door Motor -V211-, Removing and Installing"
- To rule out confusion, clearly label the wire routing, allocation and adjustment motor for each installation location prior to disconnecting the connector or removing an adjustment motor.
20 - Actuating Lever
- Do not disconnect from the connecting rod
21 - Rear Fresh Air Blower Control Module -J391-
- Refer to → Chapter "Fresh Air Blower Control Module, Removing and Installing "
- Ensure the correct allocation. Refer to the Parts Catalog.
- Check. Refer to Vehicle Diagnostic Tester in the "Guided Fault Finding" function
22 - Actuating Lever
- Mark before removing (risk of interchange)
23 - Right Rear Upper Body Vent Motor -V316-
- Refer to → Chapter "Right Rear Upper Body Vent Motor -V316-"
- To rule out confusion, clearly label the wire routing, allocation and adjustment motor for each installation location prior to disconnecting the connector or removing an adjustment motor.
24 - Air Duct on the Rear Fresh Air Blower -V80-
25 - Stud Bolt
- Stays in place when removing the heater and A/C unit in the vehicle. Refer to → Chapter "Heater and A/C Unit, Removing and Installing, High A/C System".
26 - Hex Nut
- Is already removed when removing the heater and A/C unit. Refer to → Chapter "Heater and A/C Unit, Removing and Installing, High A/C System".
- Install at the connection points for the refrigerant lines (for the tightening specification. Refer to → Chapter "Heater and A/C Unit, Removing and Installing, High A/C System").

