Audi Q7: Overview - Sliding Sunroof
Audi Q7 (4M) 2016-2025 Workshop Manual / Body / Body Exterior / Sunroof / Overview - Sliding Sunroof
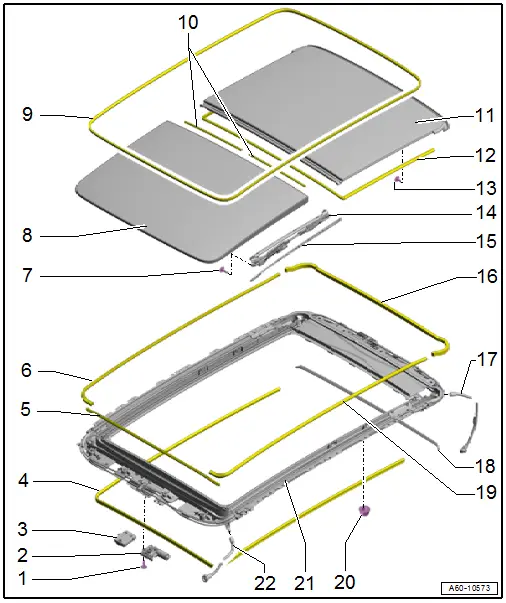
1 - Bolt
- 3 Nm
2 - Sunroof Motor -V1-
- Removing and Installing. Refer to → Chapter "Sunroof Motor -V1-, Removing and Installing".
- Perform the adaptation after installing. Refer to → Chapter "Power Sunroof Control Module -J245-, Programming".
3 - Power Sunroof Control Module -J245-
- Removing and Installing. Refer to → Chapter "Power Sunroof Control Module -J245-, Removing and Installing".
- Perform the adaptation after installing. Refer to → Chapter "Power Sunroof Control Module -J245-, Programming".
4 - Inner Seal
- Attached from the inside onto the sunroof frame
5 - Front Seal
6 - Foam Seal
- Bonded to the sunroof frame
- Replace after removing
7 - Bolt
- 3 Nm
- Replace after removing
- Self-locking
8 - Front Glass Panel
- Adjusting. Refer to → Chapter "Glass Panel, Adjusting".
- Removing and Installing. Refer to → Chapter "Glass Panel, Removing and Installing, Front".
- Perform the adaptation after installing. Refer to → Chapter "Power Sunroof Control Module -J245-, Programming".
9 - Roof Opening Seal
- Removing and Installing. Refer to → Chapter "Roof Opening Seal, Removing and Installing".
10 - Seals
- For the front glass panel
- Removing and Installing. Refer to → Chapter "Glass Panel Seal, Removing and Installing, Front".
11 - Rear Glass Panel
- Adjusting. Refer to → Chapter "Glass Panel, Adjusting".
- Removing and Installing. Refer to → Chapter "Glass Panel, Removing and Installing, Rear".
- Perform the adaptation after installing. Refer to → Chapter "Power Sunroof Control Module -J245-, Programming".
12 - Seal
- For the rear glass panel
- Removing and Installing. Refer to → Chapter "Glass Panel Seal, Removing and Installing, Rear".
13 - Bolt
- 3 Nm
- Replace after removing
- Self-locking
14 - Sliding Sunroof Tilting Mechanism
- Removing and Installing. Refer to → Chapter "Sliding Sunroof Tilting Mechanism, Removing and Installing".
- Tilting Mechanism Guide Rail, Removing and Installing. Refer to → Chapter "Tilting Mechanism Guide Rail, Removing and Installing".
- Perform the adaptation after installing. Refer to → Chapter "Power Sunroof Control Module -J245-, Programming".
15 - Trim
- For sliding sunroof tilting mechanism
16 - Foam Seal
- Bonded to the sunroof frame
- Replace after removing
17 - Rear Water Drain Hose
- Overview. Refer to → Chapter "Overview - Water Drain Hoses, Rear".
18 - Rear Trim
19 - Foam Seal
- Bonded to the sunroof frame
- Replace after removing
20 - Nut
- 8 Nm
- Tightening sequence.
21 - Sunroof Frame
- Removing and Installing. Refer to → Chapter "Sunroof Frame, Removing and Installing".
- Perform the adaptation after installing. Refer to → Chapter "Power Sunroof Control Module -J245-, Programming".
22 - Front Water Drain Hose
- Overview. Refer to → Chapter "Overview - Water Drain Hoses, Front".
Overview - Sunroof Shade
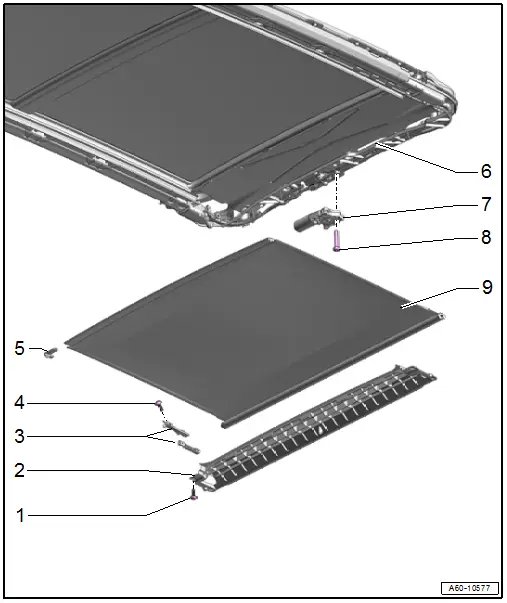
1 - Bolt
- 2.5 Nm
2 - Cross Bar
3 - Guide
- For sunroof shade
4 - Bolt
- 1.5 Nm
5 - Gliding Piece
6 - Sunroof Frame
- Removing and Installing. Refer to → Chapter "Sunroof Frame, Removing and Installing".
7 - Sunroof Shade Motor -V260-
- Removing and Installing. Refer to → Chapter "Sunroof Shade Motor -V260-, Removing and Installing".
8 - Bolt
- 3 Nm
9 - Sunroof Shade
- Removing and Installing. Refer to → Chapter "Sunroof Shade, Removing and Installing".
Overview - Wind Deflector
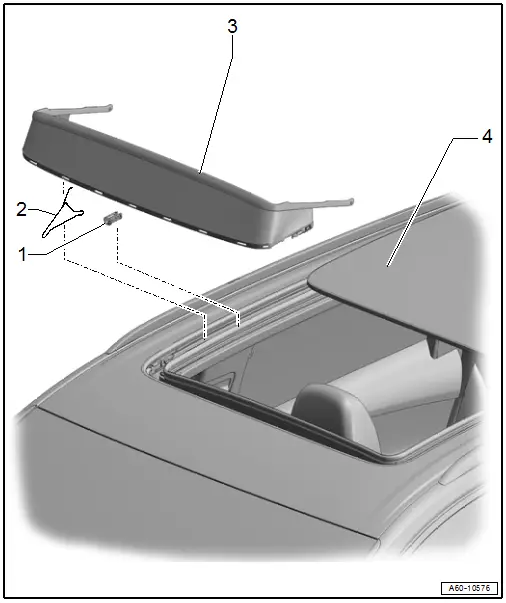
1 - Bearing
- For wind deflector
- Removing and Installing. Refer to → Chapter "Wind Deflector Bearing, Removing and Installing".
2 - Spring
- For wind deflector
3 - Wind Deflector
- Removing and Installing. Refer to → Chapter "Wind Deflector, Removing and Installing".
4 - Front Glass Panel

