Audi Q7: Overview - A/C Compressor Power Unit
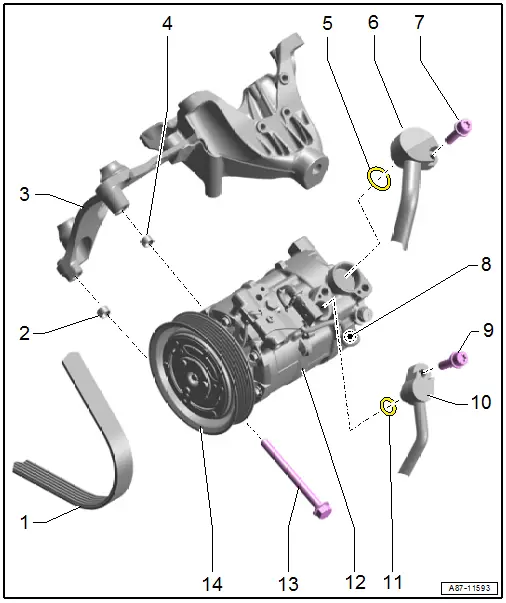
Overview - A/C Compressor Power Unit, Vehicles with 6-Cylinder TFSI Engine

1 - Ribbed Belt
- Check for wear
- Mark the running direction and install on the correct side
- Removing and installing. Refer to → Rep. Gr.13; Cylinder Block, Belt Pulley Side; Ribbed Belt, Removing and Installing.
2 - Alignment Sleeve
3 - Sub-Assembly Bracket
- There are different versions. Refer to the Parts Catalog.
- Removing and installing. Refer to → Rep. Gr.13; Cylinder Block, Belt Pulley Side; Sub-Assembly Bracket, Removing and Installing.
4 - Alignment Sleeve
5 - O-Ring
- Replace. Refer to the Parts Catalog for the version.
- Coat with refrigerant oil before installing. Refer to → Chapter "Refrigerant Circuit Seals".
6 - Low Pressure Side Refrigerant Line
7 - Bolt
- 25 Nm
8 - A/C Compressor Regulator Valve -N280-
- To check. Refer to Vehicle Diagnostic Tester in the "Guided Fault Finding" function. Refer to → Wiring diagrams, Troubleshooting & Component locations.
9 - Bolt
- 25 Nm
10 - High Pressure Side Refrigerant Line
11 - O-Ring
- Replace. Refer to the Parts Catalog for the version.
- Coat with refrigerant oil before installing. Refer to → Chapter "Refrigerant Circuit Seals".
12 - A/C Compressor
- There are different versions. Refer to the Parts Catalog.
- Refrigerant line, disconnecting and connecting. Refer to → Chapter "Refrigerant Lines, Disconnecting and Connecting at A/C Compressor".
- Removing and installing at bracket. Refer to → Chapter "A/C Compressor, Removing and Installing at Bracket".
- Removing and installing. Refer to → Chapter "A/C Compressor, Removing and Installing".
13 - Bolt
- 25 Nm
- Quantity: 3
14 - Belt Pulley with Overload Protection
- There are different versions. Refer to the Parts Catalog.
- Overview. Refer to → Chapter "Overview - Belt Pulley".
 Note
Note
With or without the A/C Clutch -N25- depending on the engine and the A/C compressor.
Overview - Belt Pulley

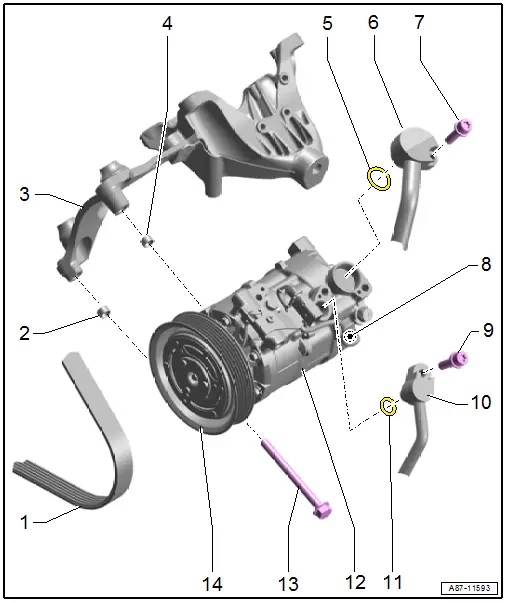
1 - Ribbed Belt
- Check for wear
- Mark the running direction and install on the correct side
- Removing and installing. Refer to → Rep. Gr.13; Cylinder Block, Belt Pulley Side; Ribbed Belt, Removing and Installing.
2 - Alignment Sleeve
3 - Sub-Assembly Bracket
- There are different versions. Refer to the Parts Catalog.
- Removing and installing. Refer to → Rep. Gr.13; Cylinder Block, Belt Pulley Side; Sub-Assembly Bracket, Removing and Installing.
4 - Alignment Sleeve
5 - O-Ring
- Replace. Refer to the Parts Catalog for the version.
- Coat with refrigerant oil before installing. Refer to → Chapter "Refrigerant Circuit Seals".
6 - Low Pressure Side Refrigerant Line
7 - Bolt
- 25 Nm
8 - A/C Compressor Regulator Valve -N280-
- To check. Refer to Vehicle Diagnostic Tester in the "Guided Fault Finding" function. Refer to → Wiring diagrams, Troubleshooting & Component locations.
9 - Bolt
- 25 Nm
10 - High Pressure Side Refrigerant Line
11 - O-Ring
- Replace. Refer to the Parts Catalog for the version.
- Coat with refrigerant oil before installing. Refer to → Chapter "Refrigerant Circuit Seals".
12 - A/C Compressor
- There are different versions. Refer to the Parts Catalog.
- Refrigerant line, disconnecting and connecting. Refer to → Chapter "Refrigerant Lines, Disconnecting and Connecting at A/C Compressor".
- Removing and installing at bracket. Refer to → Chapter "A/C Compressor, Removing and Installing at Bracket".
- Removing and installing. Refer to → Chapter "A/C Compressor, Removing and Installing".
13 - Bolt
- 25 Nm
- Quantity: 3
14 - Belt Pulley with Overload Protection
- There are different versions. Refer to the Parts Catalog.
- Overview. Refer to → Chapter "Overview - Belt Pulley".
 Note
Note
With or without the A/C Clutch -N25- depending on the engine and the A/C compressor.

